
When seedlings grow their first pair of identifiable true leaves, they are ready for transplanting. At this time, you can transplant plants either into small individual containers with more space per plant or, if temperatures allow, directly into the garden. Most garden varieties transplant well without showing signs of stress; however, some do not tolerate the transplanting process well, and you should sow them directly in the garden. It is especially important to transplant seedlings as soon as possible. If you delay transplanting until several sets of leaves have appeared, growing in the crowded seedbed may cause seedlings to become weak and spindly. At this stage, it is easier to damage seedlings during transplanting.
Timing
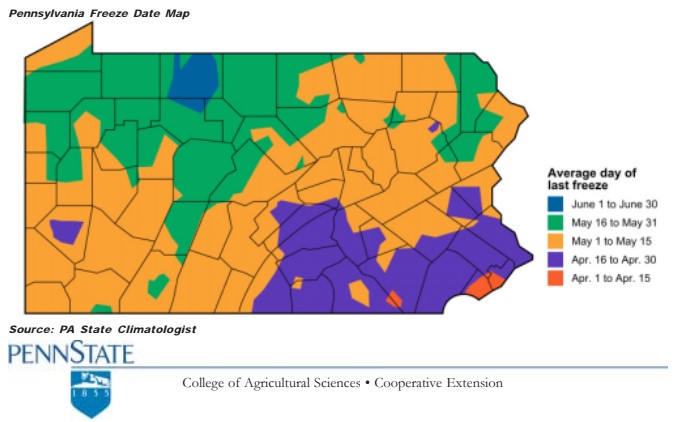
You can best gauge specific times for transplanting outdoors by the average last frost date. There are three ranges of average last frost dates for Pennsylvania. Climate zone 6 is in the southeast and regions close to Lake Erie, which modifies air temperatures; here, the last frost date ranges from March 30 to April 30. Most of the state, stretching from the northeast to the southwest, has an average last frost date between April 30 and May 30 and is classified as zone 5. In the higher regions of the Allegheny National Forest, zone 4, the range of the last frost dates begins on May 30 and ends June 30. Note that these dates are long-term averages, and dates given here may vary a week either way, depending on local topography and environmental conditions.
Transplanting into larger containers
You may have to transplant seedlings into larger containers rather than directly into the garden. Some reasons for this include:
- If the transplanting date chosen occurred before the last frost date, or if weather conditions were not ideal for transplanting because of, for example, unseasonably cold temperatures or very wet soils, and as a result, seedlings outgrew their original containers.
- If the seeds were first sown into a flat with the intention of transplanting the healthiest seedlings into their own containers.
To transplant seedlings, fill individual containers with a soilless potting mix. You can use the same sterile soulless mix or seed-starting mix that you used during germination to fill new containers, because its uniformity encourages new roots to grow into the larger space. Level the medium to about 2 inches from the top of the container. Then, make a hole (dibble), which is large enough to contain the seedling’s root system without crowding. You can do this by rotating a pencil or short pointed stick (dibble) to make a cone-shaped hole.
Using a pencil or a stick, carefully remove seedlings from the sowing container while trying not to damage the roots. Hold the seedling by its leaves instead of the stem, which can be easily injured. When placing seedlings into new pots, do not plant them any deeper than they were planted in the container used for germination. Many seedlings die because they are transplanted too deeply. Excess moisture excludes air surrounding fragile stems, causing tissue to rot and eventually die. Gently firm the soilless mix around the plant, and water the mix lightly. Check the mix to determine whether water is needed, and avoid under- or overwatering plants. Suggestions for how to determine whether plants need water include:
- Sticking a finger into the soil, and adding water if the soil is dry 1 1⁄4 to 1 1⁄2 inches deep (to the second knuckle).
- Observing signs of dry soil; i.e., dry soil is lighter in color than wet soil.
- Weighing the container before and after watering to get an idea of weight change as soil dries.
- Purchasing a water sensor that changes color based on soil moisture.
Transplanting seedlings and plants within a reasonable amount of time will help to avoid damage due to disease. However, if transplanting has been delayed until seedlings are crowded and roots have become intertwined, you should remove and separate them by a more aggressive method. Tap the container against the edge of a workbench until the soilless mix becomes loose underneath. Remove plants and root balls, and gently tease, not force, roots apart. Then, place each seedling into the new container. Remove flowers to allow energy to go into shoot and root growth, and remove dead leaves to prevent the spread of disease.
Hardening-off
In the spring, young seedlings should be hardened-off before you transplant them into the soil. Hardening-off is an acclimation process of gradually exposing plants grown under protected conditions, such as a greenhouse, hotbed, or gardener’s home, to unprotected outside conditions of full sun, wind, and cool nights. Acclimating plants to the garden environment will prevent damage from sudden changes in light intensity and temperature. Plants taken directly from the house may brown or turn white from exposure to direct sunlight and wind. Even though the plants may not die, this damage will reduce their vigor, and more time will be needed for the plants to become established and flower.
Begin hardening-off at least two weeks before transplanting. Place seedlings and small plants in a cold frame or sheltered area, and expose them to outdoor conditions for several hours on mild days. At night, you can also place plants on a sheltered porch, shed, or garage area, away from gas and engine exhaust. This protection will safeguard them from cool nighttime temperatures that may damage plants before they are hardened-off. Gradually, over 10 to 14 days, move plants into sunlight for increasing periods of time each day. Do not put tender seedlings outdoors on windy days or when temperatures are below 45°F (7°C). Reduce the frequency of watering to prevent lush, weak growth, but do not allow plants to wilt.
Transplanting into the garden
The timing and technique of transplanting annuals in the spring depends on the individual needs of each variety, but there are some general techniques used for most annuals. Tender plants have to wait until after the danger of frost has passed, but you can transplant hardier plants earlier in the spring. Even so, many annuals will not grow well until the soil warms, even if air temperatures are no longer dangerously low. When sown or transplanted into the garden, each species has an optimum space requirement. While this may vary by variety, the range of spacing is six to twelve inches. When transplanting plants that will grow during the entire season, use the greater spacing distance. However, if you only need the plants in either spring or fall, a smaller spacing distance is used. Smaller spacing can also be used where an immediate effect is desired. Many perennial plants, such as some lantana, hibiscus, and fuchsia, which can be treated as annuals, can continue to grow if given a longer season. In this case, use the widest distance between plants. While cloudy conditions are best for transplanting, it is also acceptable to plant in late afternoon or early evening, when temperatures are cooler and the sun is less intense. To transplant annuals, use a trowel to dig holes that are two times larger than the soil mass around the roots. Do not set plants deeper in the soil than the depth of the soilless mix in the germination container. As a guideline, the top of the root ball should be just under the soil surface. To remove plants from pots or cell-packs, turn them upside down and, while supporting the top of the root ball with your fingers, press on the bottom and sides of the plastic cell or tap on the pot. The intact root ball should easily pop out of its container. Most plants experience a certain amount of shock from transplanting, when roots are disturbed and unable to absorb enough water. You can reduce transplant shock by watering plants within an hour before transplanting; this keeps the root balls moist and intact when handled. After transplanting, apply a light layer of soil or mulch to reduce water evaporation from the surrounding soil.
You can place plants grown in peat pots directly into well-prepared soil, because the pots will degrade over time and decompose. Tear of any part of the pot that is above the soil after planting; otherwise, the lip of the pot may act as a wick and pull water away from the soil to the garden surface, where it will evaporate. Remove the bottom of the peat pot also, to ensure adequate drainage, and make vertical slices through the peat walls to encourage root contact with the soil. You can also set peat pellets and soil blocks directly into the ground.
After you have set plants in the garden, firm the soil around them, and water them. Fertilize newly set plants with a high phosphorus starter fertilizer solution, such as a 15-30-15, to promote root development. Follow the product label for dilution rates.
Pinching back
If seedlings have one main stem and no lateral branches, pinch them back to force lateral branches to develop. This prevents plants from becoming leggy and, instead, produces a sturdier plant that is fuller or bushier. To pinch back a spindly plant, use your thumbnail and forefinger to pinch off the terminal growth. The objective is to keep only about three to five nodes, which are points on a stem where a leaf or branch grows. To find nodes, look for buds on the stem. Once the plant is pinched back, new lateral branches will grow from these nodes. Since the end of each lateral branch usually sets flower buds, pinching back will induce plants to produce more flowers, as well as more lateral branches. Continue to pinch plants regularly to encourage branching. Pinch the plant back until the size meets your goal. Continuing to pinch beyond your size goal will prevent flowering and detract from the look and productivity of a plant.
Prepared by Phyllis Lamont, consumer horticulture center library coordinator, Kathleen M. Kelley assistant professor of consumer horticulture, and James C. Sellmer, assistant professor of ornamental horticulture.
Penn State College of Agricultural Sciences
Department of Horticulture
102 Tyson Bldg.
University Park, PA 16802
This educational blog is a series of informative articles from the Penn State Master Gardeners volunteers plus news concerning the group and their activities. For more information, click here.